How To Change Your IP Address

What Is an IP Address?
An IP (Internet Protocol) address is a unique numerical label assigned to each device connected to a network that uses the Internet Protocol for communication. It’s the digital equivalent of a home address, ensuring that data sent over the internet arrives at the right destination.
When you connect a computer, smartphone, or any other device to the internet, it’s assigned an IP address. This identifier allows websites, streaming services, and other online platforms to know where to deliver content. However, there are times you may need to understand how to change IP address, either for privacy, troubleshooting, or accessing content blocked in your region.
IP Address Versions: IPv4 and IPv6
-
IPv4 (Internet Protocol version 4)
This is the original and most common version. It uses a 32-bit address scheme, allowing over 4 billion unique addresses. An IPv4 address is typically displayed in decimal form as four octets separated by periods (e.g., 192.168.0.1). -
IPv6 (Internet Protocol version 6)
IPv6 was developed using a 128-bit address scheme to accommodate the growing number of devices, allowing for a vastly larger number of unique addresses. IPv6 addresses are displayed in hexadecimal, separated by colons (e.g., 2001:0db8:85a3:0000:0000:8a2e:0370:7334).
IP addresses can be static or dynamic. A static IP never changes, making it ideal for servers, while a dynamic IP is assigned automatically by the network (via DHCP) and may change over time. Understanding this helps when deciding how to change your IP address or how to change my IP for various reasons, including security or troubleshooting.
Why and When to Change Your IP Address
Changing your IP address can serve many purposes, from enhancing online privacy to troubleshooting network issues. An IP address is a unique identifier that links your device to the internet, revealing your approximate location and enabling websites and services to communicate with your device. While your IP address is typically assigned automatically by your internet service provider (ISP), there are times when manually changing it or using a tool like a VPN becomes beneficial—or even necessary. Whether safeguarding sensitive data, accessing restricted content, or resolving connectivity problems, knowing why and how to change your IP address can empower you to navigate the internet more securely and effectively.
Before diving into how to change IP address, consider why this action might be necessary:
- Privacy and Security: By learning how to change your ip address, you can protect your identity and browsing activity, making it harder for websites, advertisers, or hackers to track you.
- Accessing Geo-Restricted Content: Some websites and streaming platforms block content based on location. Knowing how to change ip address on iPhone, computer, or router can help you bypass restrictions by appearing as if you’re browsing from another country.
- Avoiding IP Bans or Blocks: If your IP is blocked or banned from a service, changing it can restore access. For instance, if you wonder can a IP address be changed, the answer is yes, and doing so can solve these problems.
- Troubleshooting Network Issues: Sometimes, how to reset wifi IP address becomes essential. Resetting or changing your IP can resolve conflicts caused by incorrect network configurations.
- Bypassing Firewalls: Learning how to change my IP or how do i get a new IP address can help you navigate around corporate or governmental restrictions.
- Protecting Against DDoS Attacks: If you’re under attack, obtaining a new IP address or using a service to change my IP online can thwart malicious attempts.
- Testing and Development: IT professionals and developers often need to know how to change IP phone, routers, or servers to test different environments and conditions.
Changing your IP address can be done manually, via your internet service provider, or by using tools like VPNs or proxy servers.
How To Change Your IP Address Automatically Using a VPN
A VPN (Virtual Private Network) is one of the easiest ways to handle how to change your IP address automatically. It encrypts your data and routes your traffic through its servers, giving you a new IP address and enhancing your privacy.
Steps:
- Select a VPN Provider: Choose a reputable VPN and install it on your device. This also answers queries like how to change mobile phone IP address or how to change IP address on iPhone easily.
- Connect to a Server: Simply open the VPN app, pick a server in your desired country, and connect.
- Check Your IP: Visit a “What is my IP” site to see your new IP address. If you’re wondering will my IP address change, yes, once connected to a VPN server, it changes immediately.
Recommended VPN Services
Using a VPN is one of the easiest and most secure ways to change your IP address while encrypting your online data for privacy and security. Choosing the right VPN service is essential to ensure fast, reliable, and secure connections tailored to your needs. After thorough research and testing, we’ve curated a list of the top VPN services available today, along with tips on selecting the right VPN and steps to set it up seamlessly for your online safety.

 Connect to over 94 countries
High speed streaming: Netflix, Disney+, HBO
Connect to over 94 countries
High speed streaming: Netflix, Disney+, HBO  Ultra-fast speeds
3200+ servers in 65 countries
Ultra-fast speeds
3200+ servers in 65 countries  Ultra-fast streaming experience
Over 6400 servers worldwide
Ultra-fast streaming experience
Over 6400 servers worldwide  Connect up to 6 devices simultaneously
Browse the internet with total privacy
Connect up to 6 devices simultaneously
Browse the internet with total privacy  Unlimited bandwidth on over 2,500 servers
Military-grade encryption & no logs
Unlimited bandwidth on over 2,500 servers
Military-grade encryption & no logs Here’s how to use a VPN to change your IP address:
-
Choose a Reliable VPN Service
Select a VPN provider: Look for a reputable VPN service that suits your needs. Consider factors like privacy policies, server locations, speed, and device compatibility.
Subscribe and download: Once you’ve chosen a provider, subscribe to their service and download the VPN app for your device. -
Install and Set Up the VPN
Install the application: Follow the provider’s instructions to install the VPN app on your device. This could be on a computer, smartphone, or even directly on some routers.
Log in: Open the app and log in using the credentials provided by the VPN service. -
Connect to a VPN Server
Select a server: From the VPN app, select a server location. This location will determine your new IP address. For example, if you want to appear as if you’re browsing from the UK, select a server in the UK.
Connect: Click on the connect button to establish a VPN connection. The VPN will route your internet traffic through the chosen server, changing your IP address to match that server’s location. -
Verify Your New IP Address
Check IP address: Use an online tool or website like “What is my IP” to verify that your IP address has changed to the location you connected to via the VPN.
Test functionality: Ensure you can access websites and services as expected with your new IP. If certain sites are still blocked, try connecting to a different server or consult your VPN’s support team. -
Maintain Privacy and Security
Stay connected: Keep the VPN active to maintain your new IP address and the associated privacy and security benefits.
Use secure protocols: For optimal security, ensure your VPN uses secure protocols like OpenVPN, WireGuard, or IKEv2. -
Troubleshooting Common VPN Issues
Connection drops: If your VPN connection drops frequently, try switching to a different server or adjusting your VPN settings.
Slow speeds: VPNs can slow down your connection due to encryption overhead. If this becomes an issue, try servers closer to your physical location or consult your VPN provider for optimized servers.
How To Change Your IP Address Manually
If you prefer a hands-on approach, you can manually change IP address on various devices. This method works well if you need a static IP or want direct control. For instance, if you want to know how to change IP on your phone, how to change my IP on Windows, macOS, or Linux, or even how to change mobile phone IP address, follow the steps below.
Windows 11: How to Change Your IP Address
-
Open Network & Internet Settings:
- Click Start and then click Settings.
- Navigate to Network & Internet.
-
Choose Your Network (Ethernet or Wi-Fi):
- Select Ethernet or Wi-Fi based on your connection.
- Click Manage, and then select Edit next to IP assignment.
-
Set IP Configuration:
- Under Edit network IP settings, choose Automatic (DHCP) for dynamic IP or Manual for a static IP.
- If using a static IP, enable IPv4, and enter the IP address, Subnet mask, and Gateway.
-
Save Your Settings:
- Click Save to apply the new IP address.
Windows 10: How to Change Your IP Address
-
Access Network & Internet Settings:
- Click Start and open Settings.
- Go to Network & Internet.
-
Select Your Local Area Connection:
- Click Properties under your active connection (Ethernet or Wi-Fi).
-
Change IP Assignment:
- Under IP assignment, click Edit.
- Choose Manual, toggle on IPv4, and enter your new IP address, Subnet mask, and Gateway.
-
Save Changes:
- Click Save to apply the new IP address.
macOS: How to Change Your IP Address
-
Open System Preferences:
- Click the Apple menu in the top left corner and select System Preferences.
-
Go to Network Settings:
- Click Network.
-
Select Your Network:
- In the left column, select your active network (Wi-Fi or Ethernet), then click Advanced.
-
Configure IP Address:
- In the TCP/IP tab, select Manually from the Configure IPv4 dropdown.
- Enter the new IP address, Subnet Mask, and Router (Gateway).
-
Save and Apply Changes:
- Click OK, then Apply to activate the new IP address.
iOS (iPhone/iPad): How to Change Your IP Address
-
Open Settings:
- Go to Settings on your iPhone or iPad.
-
Go to Wi-Fi:
- Tap Wi-Fi, and choose your active network.
-
Configure IP Settings:
- In the IPv4 Address section, tap Configure IP.
- Select Manual and enter the new IP address, Subnet Mask, and Router (Gateway).
-
Save Your Settings:
- Tap Save to apply the new IP address.
Android: How to Change Your IP Address
-
Open Android Settings:
- Go to Settings and select Connections or Wireless & Networks.
-
Access Wi-Fi Settings:
- Tap Wi-Fi, and select your connected network.
- Press and hold the network, and tap Modify Network.
-
Edit IP Configuration:
- Expand Advanced options, change IP settings from DHCP to Static.
- Enter your new IP address, Subnet Mask, and Gateway.
-
Save the Changes:
- Tap OK to save and apply the new settings.
How To Change Your IP Address on Linux Without a VPN
Linux users can use the command line or configuration files to change IP addresses. This method is ideal if you want to know how to reset wifi IP address or modify server configurations.
-
Using Command Line (Temporary Change)
Determine Network Interface:
Open a terminal and type ‘ip addr’ or ‘ifconfig’ to list all network interfaces. Identify the interface you want to modify, such as ‘eth0’ for Ethernet or ‘wlan0’ for Wi-Fi. -
Change IP Address Temporarily:
For a temporary change, use the ‘ip’ command:
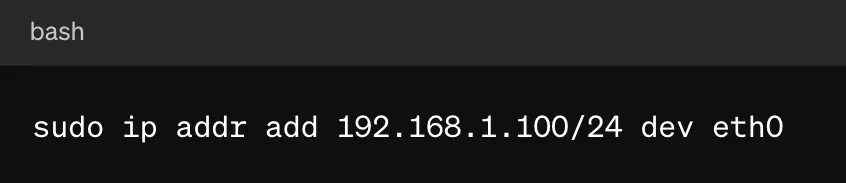
Replace ‘192.168.1.100/24’ with your desired IP address and subnet and ‘eth0’ with your network interface.
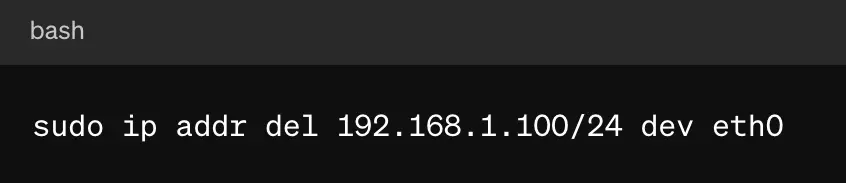
To remove the old IP address:
Using Network Manager (Persistent Change)
-
Edit Configuration File:
For a persistent change, locate the network configuration file for your interface. This is often found in ‘/etc/network/interfaces’ or “/etc/sysconfig/network-scripts/ifcfg-eth0’ for older distributions, or you can use NetworkManager on newer systems. -
How to Set Static IP Address:
Open the configuration file in a text editor like ‘nano’ or ‘vim.’ For a static IP, you might add:
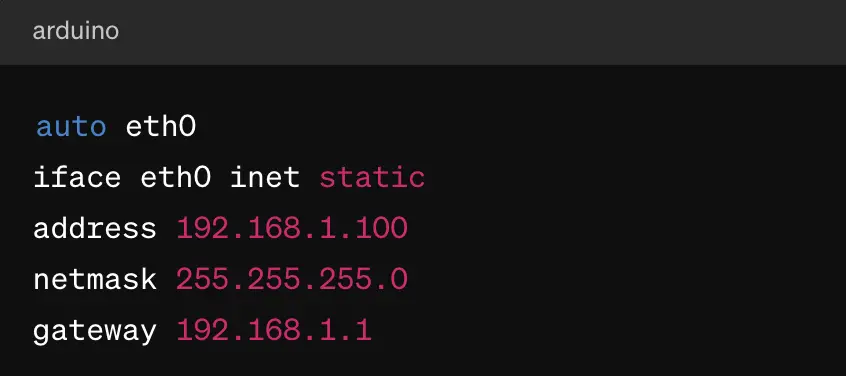
Adjust the ‘address’, ‘netmask’, and ‘gateway’ to fit your network.
How to Set Static IP Address For Windows:
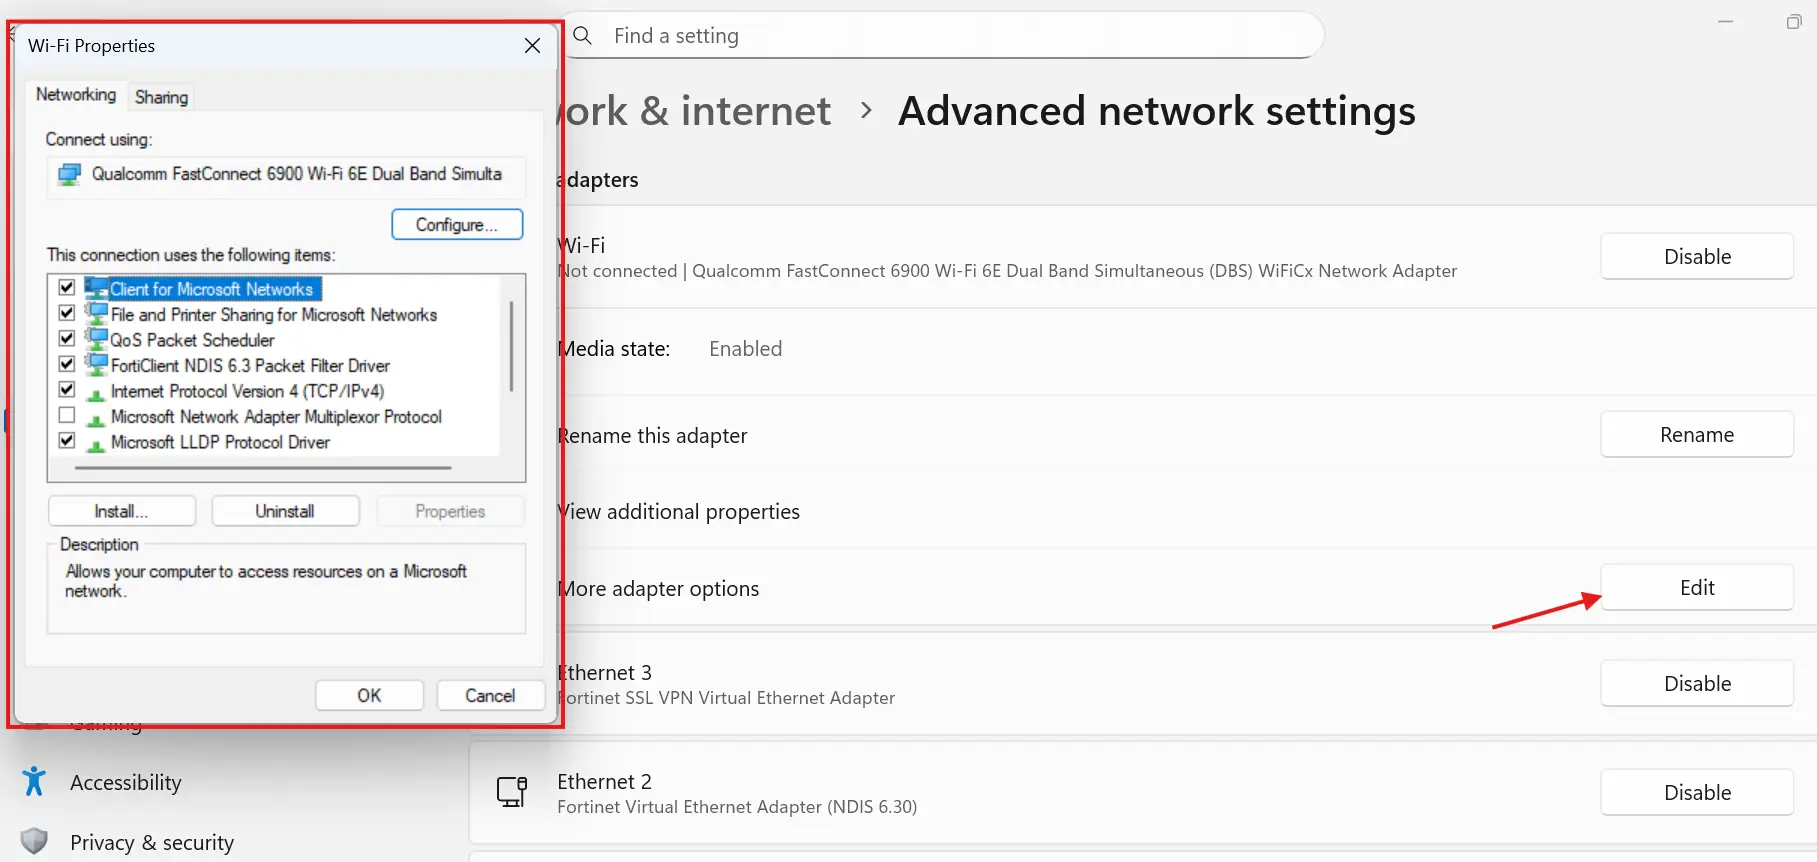
1. Open Control Panel -> Network and Internet -> Network and Sharing Center.
2. Click Edit on “More adapter options.” Right-click your connection (Wi-Fi or Ethernet) and choose Properties,.
3. Click on Internet Protocol Version 4 (TCP/IPv4) and click the Properties button.
4. Select “Use the following IP address.“
5. Type in the numbers:
◦ IP Address: The new permanent number you chose (e.g., 192.168.1.4).
◦ Subnet Mask, Gateway, DNS: Type in the numbers you wrote down in Step 1.
6. Click OK.
-
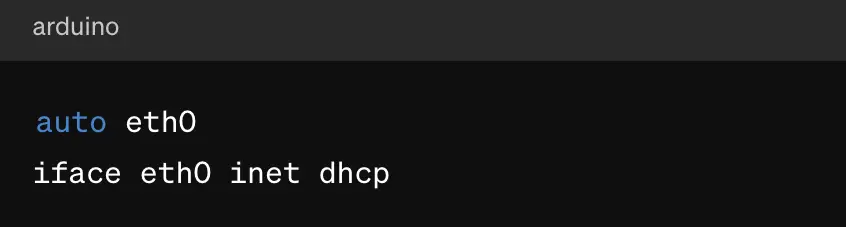
Enable DHCP (Dynamic IP):
To use DHCP for dynamic IP assignment, modify the file to include:
-
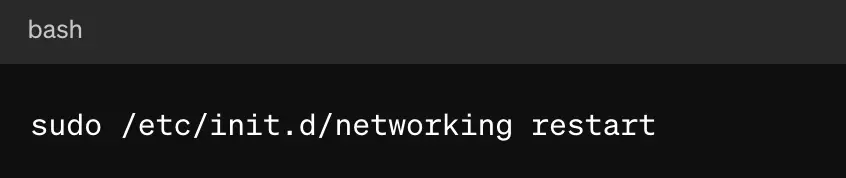
 Restart Network Services:
Apply the changes by restarting the network service:
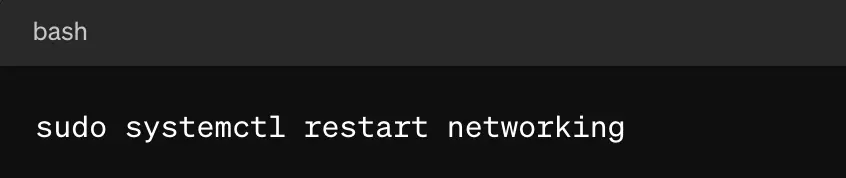
Or, on older systems:
Using ‘nmcli’ Tool (NetworkManager)
-
Modify IP Address with ‘nmcli’:
If you’re using NetworkManager, the ‘nmcli’ tool is handy. To set a static IP:
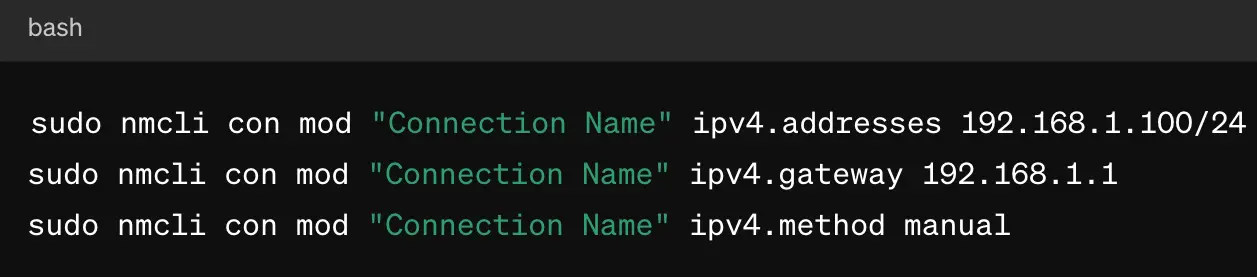
Replace “Connection Name” with your connection’s name, which can be found with ‘nmcli con show’.
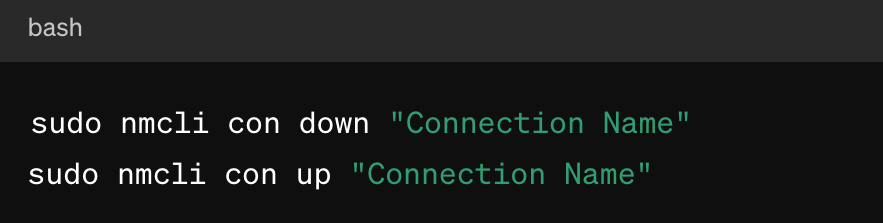
-
Apply Changes:
Restart the network connection to apply the changes:
These methods cover most scenarios for changing your IP address on Linux, whether you need a temporary or persistent change or prefer a graphical or command-line approach.
How To Change Your IP Address on Your Router Without a VPN
Changing the IP address on your router can help manage your home network, enhance security, and sometimes circumvent connectivity issues. Here’s a step-by-step guide to changing your IP address on a router:
-
Access Your Router’s Web Interface
Find your router’s IP address: This is typically ‘192.168.0.1’, or ‘192.168.1.1’, or a similar address. You can find it by checking the default gateway on your computer’s network settings.
Log in: Open a web browser and enter the router’s IP address in the address bar. You’ll be prompted to log in. Unless you’ve changed them, use the default username and password found on your router or in its manual. -
Locate IP Address Settings
Navigate to settings: Once logged in, look for sections like “LAN Settings,” “Network Settings,” or “Setup.” The exact naming can vary by brand and model.
Find IP address configuration: Look for settings related to the IP address. This might be under a subsection like “DHCP Server” or “Internet Setup.” -
Change the Router’s IP Address
Modify LAN IP address: To change the router’s local IP address (the address used within your home network), find the field for the router’s IP address and enter the new address you want to use. Ensure it’s within the same subnet (e.g., if your network is 192.168.1.x, use something like 192.168.1.100).
Adjust DHCP range: If you change the router’s IP address, ensure the DHCP IP range is compatible with the new address. For instance, if your router’s new IP is 192.168.1.1, set the DHCP range to something like 192.168.1.2 to 192.168.1.254. -
Change the Router’s Public IP Address
Dynamic IP: If your ISP assigns dynamic IPs, you can usually change your public IP by restarting your router. Simply unplug it, wait a few minutes, and plug it back in.
Static IP: For a static IP, contact your ISP. Some ISPs allow changing the static IP through their customer service portal or require a formal request. -
Apply and Test Changes
Save and restart: After making changes, save them and reboot the router if necessary. This applies the new settings.
Verify: Check your new IP address by connecting a device to the network and using an online tool like “What is my IP” to see the public IP or check the device’s network settings for the local IP. -
Security and Troubleshooting
Update passwords: After changing IP settings, it’s good practice to change the default login credentials if you haven’t already.
Troubleshoot connectivity issues: If you encounter problems, ensure all settings, including subnet masks and gateways, are correctly configured. Resetting the router to factory settings is a last resort if other troubleshooting fails.
Using these steps, you can change your router’s IP address to enhance network management and security or solve specific network issues.
How To Change Your IP Address Automatically Using a Proxy Server
A proxy server routes your internet traffic through its IP, instantly giving you a new IP address without in-depth technical changes:
-
Choose a Proxy Service
Select a proxy provider: Find a reliable proxy service. There are free and paid options, but paid proxies often offer better speed, security, and reliability.
Obtain proxy details: After subscribing, you will receive the proxy’s IP address, port number, and possibly a username and password. -
Configure Proxy Settings on Your Browser
- For Web Browsers (e.g., Chrome, Firefox)
-
-
- Go to the browser’s settings or preferences.
- Look for the network or connection settings.
- Choose to configure proxy settings manually.
- Enter the proxy IP address and port number. If required, provide the username and password.
-
-
Configure Proxy Settings on Your Operating System
For Windows:
Open “Settings” and go to “Network & Internet.”
Select “Proxy” in the sidebar.
Turn on “Use a proxy server” under “Manual proxy setup.”
Enter the proxy’s IP address and port. Include credentials if necessary.
For macOS:
Open “System Preferences” and click on “Network.”
Select your network service (e.g., Wi-Fi) and click “Advanced.”
Go to the “Proxies” tab.
Check the box for “Web Proxy (HTTP)” or “Secure Web Proxy (HTTPS)” and enter the proxy details.
For Linux:
Depending on your environment, you may need to set environment variables:

Alternatively, configure proxy settings in specific applications or network managers.
-
Verify Your New IP Address
Check IP address: Once connected through the proxy, visit a website like “What is my IP” to confirm your IP has changed to the proxy’s IP.
Ensure connectivity: Browse a few websites to ensure the proxy is functioning correctly and not blocking your access. -
Troubleshooting and Security Tips
Connection issues: If you can’t connect, double-check the proxy settings and credentials and ensure the proxy service isn’t down.
Security practices: Use proxies from reputable providers to avoid security risks. Be cautious with sensitive data over proxies, especially free ones.
Persistent configuration: For ongoing use, save your proxy settings and reapply after network changes or system restarts.
By following these steps, you can change your IP address using a proxy server. This provides a balance of privacy and access without needing extensive network configuration.
How To Change Your IP Address with Your Internet Service Provider (ISP)
Changing your IP address through your Internet Service Provider (ISP) is another approach that is especially useful if you need a new static or dynamic public IP address.
Here’s how to proceed:
-
Understand Your Current IP Type
Check Your IP Status: Determine if your current IP is static or dynamic. Static IPs do not change unless manually modified by the ISP, while dynamic IPs can change periodically.
Identify the Need: Understand why you need to change your IP. Common reasons include resolving network issues, enhancing security, or bypassing IP-based restrictions. -
Contact Your ISP
Customer support: Reach out to your ISP’s customer support via phone, email, or live chat. Explain that you want to change your IP address and specify whether you prefer a static or dynamic IP.
Provide account information: To facilitate the process, be ready to provide account details, such as your account number or verification information. -
Request an IP Change
Static IP: If you require a static IP (often for business or specific home uses), inquire about the availability and cost. Changing to a static IP usually involves an additional fee.
Dynamic IP: For a dynamic IP, ask if they can force an update or if you need to take specific actions, like restarting your modem or router. -
Follow ISP Instructions
Modem/router reset: Your ISP might instruct you to reset your modem or router. This can often prompt a change in dynamic IPs.
Unplug your modem or router, wait for about one minute, and then plug it back in.
Monitor the connection as it re-establishes to see if the IP changes.
Configuration changes: The ISP may guide you through any necessary settings or send a technician for static IPs or specific dynamic IP requests. -
Verify the New IP Address
Check your IP: After following the ISP’s instructions, use an online tool or your device’s network settings to verify the new IP address.
Document changes: Record any changes for future reference, especially if new configurations are applied. -
Consider Long-Term Implications
Service terms: Be aware of any changes in service terms, especially if switching to a static IP, as it may affect your billing.
Ongoing support: Ensure you have access to support for future inquiries or issues related to the IP change.
By coordinating with your ISP, you can effectively change your IP address to meet your specific needs, whether for troubleshooting, security enhancement, or compliance with specific network requirements.
Does Changing IP Address Affect SEO?
A common concern is does changing IP address affect SEO. Generally, changing your IP will not harm your personal browsing experience. For websites, hosting on a different IP might have a minimal impact on SEO, but it’s more about server location and quality than just the address itself.
Final Thoughts
Whether you’re learning how to change your IP address, looking to change your IP online, or wondering how to change your mobile phone IP address, the key is understanding your goals. From boosting privacy and security to accessing blocked content and solving network issues, knowing how to change IP addresses empowers you to navigate the online world with greater control and confidence.
FAQ
Q: Can I change my IP address without technical skills?
A: Yes, you can easily change your IP address using a VPN or proxy service without needing technical skills. These services offer user-friendly interfaces that guide you through the process.
Q: Is changing my IP address legal?
A: Generally, changing your IP address is legal as long as it’s done for legitimate purposes, such as enhancing privacy, accessing regionally blocked content, or troubleshooting network issues.
Q: Will changing my IP address affect my internet speed?
A: Using a VPN or proxy might slightly decrease speed due to data encryption and routing. However, changing your IP through your ISP or manually usually doesn’t impact speed.
Q: How often can I change my IP address?
A: If you have a dynamic IP, it can change each time you reconnect to your network. With a VPN or proxy, you can change it as often as you like by switching servers.