How to Group Things on Canva (Desktop, Mobile & Shortcuts)
To group things in Canva, hold Shift (Windows) or Command (Mac) and click each element you want to group, then press Ctrl+G (Windows) or Cmd+G (Mac), or right-click and choose Group from the menu. To ungroup, select the group and press Ctrl+Shift+G (Windows) or Cmd+Shift+G (Mac). On mobile, tap and hold the first element, choose Select Multiple, tap the other elements, then tap Group. The catch: grouping locks the elements’ positions relative to each other, so if you want to resize one element inside a group, you must ungroup first.
Why grouping matters in Canva
Grouping elements is one of the highest-leverage habits in Canva’s graphic design toolkit. Without it, moving a composed design — say, a logo lockup with text and icon — means nudging each piece individually and re-aligning everything afterward. With grouping, the whole composition travels as a single unit.
Here’s what grouping actually unlocks in practice:
- Move complex layouts instantly — drag a group anywhere without losing internal alignment
- Resize proportionally — pull a corner handle to scale every element together
- Duplicate entire compositions — Ctrl/Cmd+D copies the whole group, ideal for repeating layouts in Canva presentations
- Layer with confidence — send grouped objects forward/backward without touching individual items
- Protect your work — lock a group to prevent accidental edits during complex design sessions
💡 Pro Tip: Grouping is the foundation of reusable design components in Canva. Build a header, CTA block, or branded footer as a group, then duplicate it across pages.
How to group on desktop (step by step)
- Open your Canva design: Open any existing project or start a new one at canva.com. Make sure you have at least two elements on the canvas before grouping.
-
Select multiple elements
-
Method A — Drag select:
Click on an empty area of the canvas, then drag your cursor across all the elements you want to group. Everything inside the selection rectangle gets highlighted. -
Method B — Shift-click:
Click the first element, then hold Shift and click each additional element one by one. This is useful when elements are scattered across the canvas or overlapping others you want to skip.
-
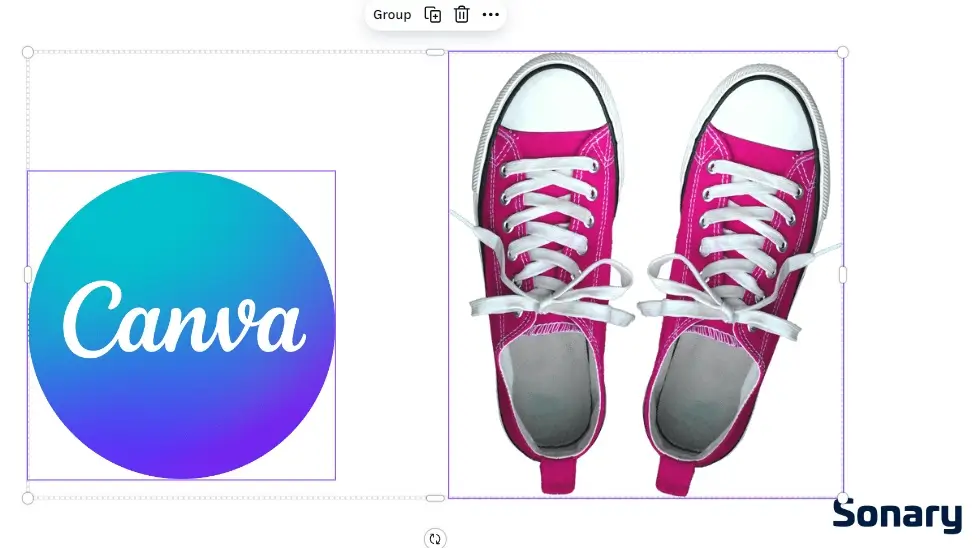
- Group the selection
Once selected (you’ll see a combined bounding box), do one of the following:
— Press Ctrl+G (Windows) or Cmd+G (Mac)
— Click
Group
in the floating toolbar above the canvas
— Right-click any selected element and choose
Group - Edit inside the group without ungrouping
To edit a single element within the group,
double-click
the group. This enters “group edit mode,” letting you click individual items and modify them — text, colors, image — without breaking the group structure. Press Escape to exit back to group level.
How to group on Canva mobile & iPad
Iphone & Android
- Tap and hold the first element
A context menu will appear with editing options. - Tap “Select Multiple”
Each element you tap next will be added to the selection and highlighted. - Tap “Group” in the bottom toolbar
The selected elements merge into a single grouped object.
iPad
- Use two fingers to drag-select
On iPad, you can drag two fingers across the canvas to select multiple elements at once — faster than tap-and-hold. - Or tap and hold → “Select Multiple”
Same method as iPhone. Tap each additional element to add it to the selection. - Tap “Group” in the toolbar
If you have a keyboard connected to your iPad, Cmd+G also works.
All grouping keyboard shortcuts
- Group selected elements
- Ctrl+G – Windows
- ⌘+G – Mac
- Ungroup selection
- Ctrl+Shift+G – Windows
- ⌘+⇧+G – Mac
- Select all elements on page
- Ctrl+A – Windows
- ⌘+A – Mac
- Duplicate a group
- Ctrl+D – Windows
- ⌘+D – Mac
- Undo accidental ungroup
- Ctrl+Z – Windows
- ⌘+Z – Mac
- Enter group edit mode
- Double-click the group
Pro tip: Practice the keyboard shortcuts on a throwaway design for 5 minutes once. After that, every Canva project gets 20%+ faster because grouping becomes muscle memory, and you stop reaching for the right-click menu.
What you can’t group in Canva (and why)
This is the section Canva’s own help doc doesn’t fully explain—and it’s where most frustration occurs. Not everything can be grouped, and the reasons aren’t always obvious.
| Element Type | Can Group? | Notes |
| Text boxes | ✓ Yes | Any combination of headlines, body text, labels |
| Images & photos | ✓ Yes | Includes uploaded images and Canva stock photos |
| Shapes & icons | ✓ Yes | All native Canva shapes and icon library elements |
| Frames & grids | ✓ Yes | Frame can group with others; content inside stays independent |
| Charts & tables | ✓ Yes | Can group with other elements, but chart data stays editable individually |
| Third-party App elements | ✗ No | Elements added from Canva’s “Apps” tab cannot be grouped. Workaround: right-click → Download Selection → re-upload as PNG |
| Elements on different pages | ✗ No | Canva groups only work within a single page. You cannot group across pages. |
| Locked elements | ✗ No | Unlock the element first (right-click → Unlock), then group |
⚠ Common Mistake
If your “Group” option is greyed out, check if any selected element came from the Apps tab. Even one app-sourced element in your selection will block grouping for the entire set.
How to ungroup elements in Canva
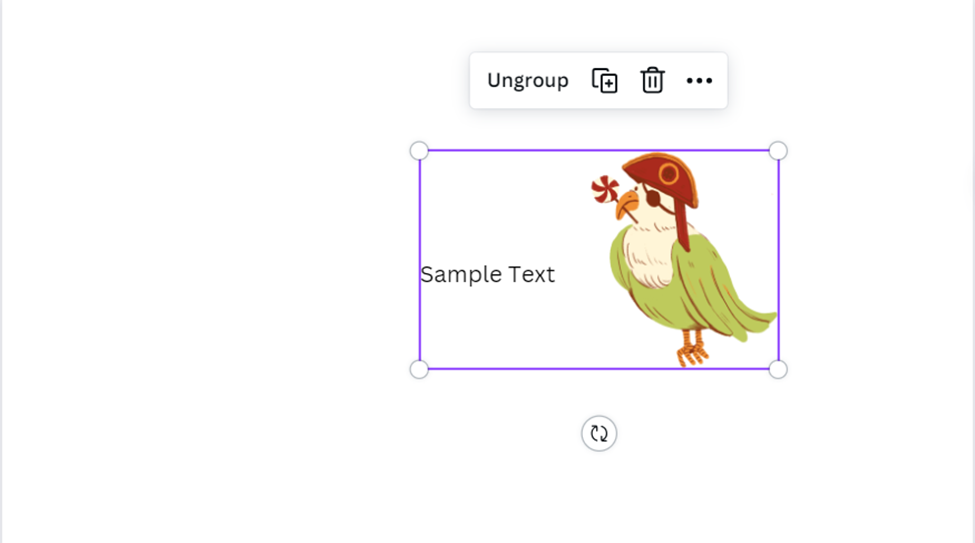
- Click the group to select it
You’ll see a single bounding box around all elements in the group. - Ungroup with shortcut or toolbar
Press Ctrl+Shift+G (Windows) / Cmd+Shift+G (Mac), or click – Ungroup
in the floating toolbar, or right-click →Ungroup - Each element is now independent
You can now edit, reposition, or delete individual items. Regroup anytime by selecting them again and pressing Ctrl/Cmd+G.
💡 Remember
You don’t always need to ungroup to edit. Double-clicking the group enters edit mode and lets you modify individual elements without breaking the group.

Pro workflow tips for grouping in Canva
1. Group before you duplicate
If you’re creating a repeating element — a testimonial card, a pricing row, a social post template — group all its parts first, then duplicate with Ctrl/Cmd+D. Editing becomes dramatically faster: change one group’s text, and the rest serve as locked reference copies.
2. Use layering before you group
Group order matters. Before pressing Ctrl+G, use Position → Arrange (or right-click → Bring Forward / Send Backward) to set which elements overlap which. Once grouped, the internal layer order is locked relative to each other — so get it right first.
3. Name your groups in the Layers panel
On desktop, open the Layers panel (View → Show Layers). Double-click any group in the panel to rename it — “Header Block,” “CTA Section,” etc. This is invaluable for complex designs with 20+ elements and nested groups.
4. Nest groups for brand components
You can group a group. Build a logo (icon + wordmark) as one group, add a tagline as a text box, then group both together into a “Brand Lockup” group. Nesting up to 3–4 levels works reliably in Canva without performance issues. If you’re working at a professional UI/UX scale that demands more structural control, see how Canva compares to Figma for component-based design.
5. Lock groups to protect finished sections
Right-click a group → Lock to freeze it. Locked groups can’t be moved, resized, or edited — ideal for completed sections of a multi-page design where you don’t want accidental nudges.
✓ Best Practice
Build a library of grouped “components” — headers, CTAs, footers, icon+label pairs — and save them to your Brand Kit or a dedicated Canva design file. Paste them across projects to maintain visual consistency.
6. Grouping vs. Locking vs. Layering — when to use each
| Feature | Use When | Key Shortcut |
| Grouping | You need to move/resize/duplicate multiple elements as one | Ctrl/⌘+G |
| Locking | A section is finalized and shouldn’t be accidentally moved | Right-click → Lock |
| Layering | Controlling which element appears on top of another | Position → Arrange |
| Alignment | Precisely distributing elements before grouping | Position → Align |
Related Articles
Troubleshooting: Group button missing or greyed out?
Problem: “Group” doesn’t appear in the toolbar
This means Canva doesn’t recognize a multi-element selection. Causes and fixes:
Only one element is selected — hold Shift and click at least one more element
You clicked on an empty area — your second click deselected the first. Use the Shift+click method
Browser cache issue — close the browser tab, reopen Canva, try again
Problem: Group button is visible but clicking does nothing
One of your selected elements is from a third-party Canva App. Identify it by process of elimination (deselect elements one at a time until Group works), then either remove it or use the download-and-reupload workaround mentioned in the limitations table above.
Problem: Can’t find my grouped design
Groups don’t disappear — they may have been moved off-canvas or sent to the back behind other elements. Check: View → Show Layers to locate any hidden or buried groups, and use Ctrl/Cmd+A to select everything and see what’s there.
⚠ Note
If the design file was shared from another team in Canva, you may not have edit permissions. Check file ownership and your team role if the Group option remains permanently greyed out.
What is the difference between grouping in Canva and grouping in Figma?
Canva grouping treats the group as a single block for movement and resizing; Figma grouping (Frames + Auto Layout) treats the group as a layout container with rules. Canva is faster for static design; Figma is more powerful for repeating layouts.
| Dimension | Canva groups | Figma frames + groups |
|
Keyboard shortcut to group |
Ctrl+G / Cmd+G |
Ctrl+G / Cmd+G (group), Shift+A (frame) |
|
Auto-resize child elements |
No |
Best (Auto Layout) |
|
Constraint-based positioning |
No |
Best |
|
Nested groups |
Limited |
Best |
|
Best for |
Static marketing graphics |
Repeating UI components |
|
Learning curve |
5 minutes |
1+ hour |
Use Canva for one-off marketing graphics. Use Figma when you need the same layout to scale, repeat, or respond to content changes.
Do you actually need to group everything in Canva?
Most Canva users group too aggressively, losing flexibility. Grouping is best reserved for elements you genuinely want to move or resize as a single unit, not for every visual cluster.
Before you Ctrl+G, ask whether you will need to edit those elements individually within the next 24 hours. If yes, leave them ungrouped; the ungroup-edit-regroup cycle is friction that adds up. The right grouping habit is to group only the ‘finished’ visual blocks you intend to duplicate or move as a single unit. Everything still in flux stays loose.
What do people actually ask?
What is the keyboard shortcut to group things in Canva?
On Windows: Ctrl+G to group, Ctrl+Shift+G to ungroup. On Mac: Cmd+G to group, Cmd+Shift+G to ungroup. The shortcuts work on Canva web, desktop app, and any browser.
Can you group elements on the Canva mobile app?
Yes. Tap and hold the first element, choose Select Multiple from the menu, tap each additional element, then tap the Group button at the bottom of the screen. There is no keyboard shortcut on mobile.
Why can’t I group elements in Canva?
The most common reasons are (1) you only have one element selected, (2) you have a locked element in your selection, or (3) you are inside an existing group already. Fix by Esc to deselect and starting fresh.
How do you ungroup in Canva?
Select the grouped block and press Ctrl+Shift+G (Windows) or Cmd+Shift+G (Mac), or right-click and choose Ungroup.
Can you edit a single element within a Canva group without ungrouping?
Yes. Double-click the element to enter edit mode while the group remains intact. Click outside the element to return to the grouped state.
Does grouping work on the Canva free plan?
Yes, grouping is available on every Canva plan, including the free tier. There are no Pro-only grouping features.
Can you group elements across two Canva pages?
No. Groups are page-scoped in Canva. To replicate a group across pages, duplicate the page or use a brand-kit template.
How do you lock a Canva group so it doesn’t move?
Select the group and click the lock icon in the top toolbar, or press the keyboard shortcut Alt+Shift+L (Windows) or Option+Shift+L (Mac). Locked groups can still be selected and unlocked.
Where can you go deeper?
- Best graphic design software
- Canva review
- Canva vs Figma
- Best AI tools for graphic design
- How we test design software
What is the bottom line?
To group items in Canva, multi-select with Shift+click, then press Ctrl+G (Windows) or Cmd+G (Mac). To ungroup, press Ctrl+Shift+G or Cmd+Shift+G. On mobile, tap and hold, select Select Multiple, then Group. Double-click to edit individual elements inside a group without breaking it. Grouping is free on every Canva plan. The single biggest mistake is grouping every visual cluster; group only the finished blocks you plan to move or duplicate as one unit. Verified May 2026; Canva’s grouping behavior has been stable since