Photoshop Keyboard Shortcuts: Boost Your Workflow Efficiency
Unlock Adobe Photoshop’s full potential with these essential keyboard shortcuts. Designed to streamline your workflow and boost productivity, these Photoshop commands will help you easily navigate and manipulate your canvas. Whether you’re a beginner or a seasoned pro, mastering these keyboard Photoshop controls for Adobe Photoshop is key to efficient and effective design.
In the fast-paced world of digital design, efficiency is everything. Adobe Photoshop, a powerful tool for creators, becomes even more formidable when paired with the right keyboards for Photoshop. This guide presents a curated list of essential Photoshop tool shortcuts that will help you work smarter and faster, allowing you to focus on what truly matters – your creativity. Function keys (F1, F2, etc.) generally have the same functionality on both Mac and Windows platforms.
Is a cornerstone of digital creativity, offering many tools and features. However, navigating through its many functions can be time-consuming. By mastering these essential Photoshop quick keys, you can enhance your productivity and streamline your design process, making your creative journey smoother and more enjoyable.


Features
Writing Features
Video Editing Features
Photo Editing Features
Image Generating Features
Available on
Pros & Cons
Pros
Cons
Photoshop Keyboard Shortcuts You Should Know
General Shortcuts
- Copy: Control + C (Windows), Command + C (macOS)
- Copies the selected item or layer to the clipboard.
- Paste: Control + V (Windows), Command + V (macOS)
- Pastes the copied item or layer from the clipboard.
- Cut: Control + X (Windows), Command + X (macOS)
- Cuts the selected item or layer and copies it to the clipboard.
- Undo: Control + Z (Windows), Command + Z (macOS)
- Reverts the last action performed.
- Redo: Control + Shift + Z (Windows), Command + Shift + Z (macOS)
- Re-applies the last action that was undone.
- Duplicate: Control + J (Windows), Command + J (macOS)
- Creates a copy of the selected layer.
- Save As: Control + Shift + S (Windows), Command + Shift + S (macOS)
- Saves the current document under a new name.
- Save for Web: Control + Shift + Alt + S (Windows), Command + Shift + Option + S (macOS)
- Opens the Save for Web dialog to optimize images for the web.
Navigation and Viewing
- Zoom In: Control + + (Windows), Command + + (macOS)
- Increases the zoom level of the canvas, a quick and efficient Photoshop full screen shortcut.
- Zoom Out: Control + – (Windows), Command + – (macOS)
- Decreases the zoom level of the canvas.
- Fit to Screen: Control + 0 (Windows), Command + 0 (macOS)
- Adjusts the canvas to fit entirely within the screen.
- Actual Pixels (100%): Control + 1 (Windows), Command + 1 (macOS)
- Displays the canvas at 100% zoom level, showing actual pixel size.
- Hand Tool: Spacebar (Windows and macOS)
- Temporarily activates the Hand Tool to pan around the canvas.
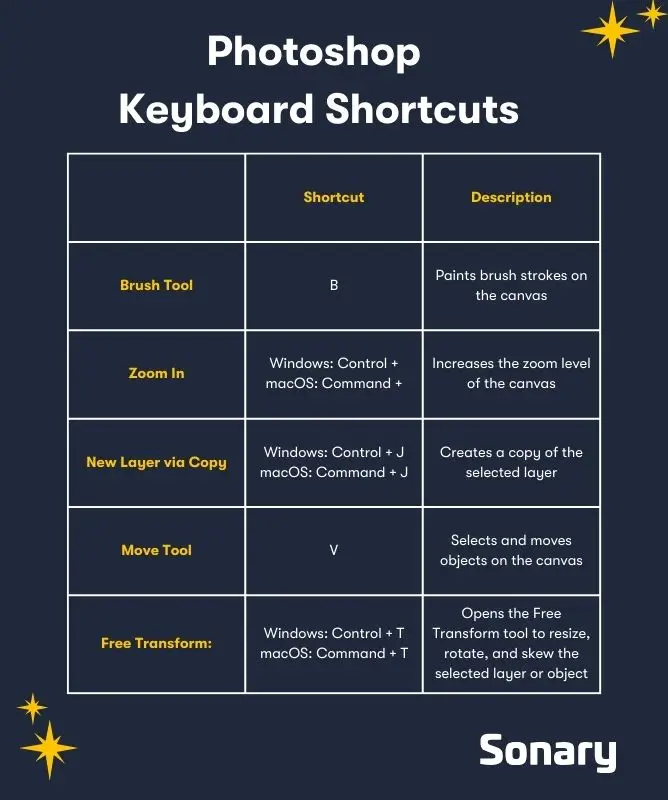
Tools
- Move Tool: V (Windows and macOS)
- Selects and moves objects on the canvas.
- Rectangular Marquee Tool: M (Windows and macOS)
- Selects rectangular areas of the canvas.
- Lasso Tool: L (Windows and macOS)
- Freehand selects areas of the canvas.
- Magic Wand Tool: W (Windows and macOS)
- Selects areas of similar color with a single click.
- Crop Tool Shortcut Key in Photoshop: C (Windows and macOS)
- Trims or expands the canvas size.
- Eyedropper Tool: I (Windows and macOS)
- Samples colors from the canvas.
- Brush Tool: B (Windows and macOS)
- Paints brush strokes on the canvas.
- History Brush Tool: Y (Windows and macOS)
- Paints with the previous state of the image.
- Gradient Tool: G (Windows and macOS)
- Creates a gradual blend between multiple colors.
- Eraser Tool: E (Windows and macOS)
- Erases pixels on the canvas.
- Pen Tool: P (Windows and macOS)
- Draws precise paths and shapes.
- Path Selection Tool: A (Windows and macOS)
- Selects and moves paths and anchor points.
- Horizontal Type Tool: T (Windows and macOS)
- Adds horizontal text to the canvas.
- Rectangle Tool: U (Windows and macOS)
- Draws rectangular shapes.
- Zoom Tool: Z (Windows and macOS)
- Zooms in or out on the canvas.
- Hand Tool: H (Windows and macOS)
- Moves the view of the canvas.
Layers
- Select All Layers: Control + Alt + A (Windows), Command + Option + A (macOS)
- Selects all layers in the Layers panel.
- Merge All Layers: Control + Shift + E (Windows), Command + Shift + E (macOS)
- Combines all visible layers into one layer.
- Select Top Layer: Alt + . (period) (Windows), Option + . (period) (macOS)
- Selects the topmost layer.
- Select Bottom Layer: Alt + , (comma) (Windows), Option + , (comma) (macOS)
- Selects the bottommost layer.
- Select Next Layer Down/Up: Alt + [ or ] (Windows), Option + [ or ] (macOS)
- Selects the layer below or above the current layer.
- Move Target Layer Down/Up: Control + [ or ] (Windows), Command + [ or ] (macOS)
- Moves the selected layer down or up in the stack.
- Move Layer to Bottom/Top: Control + Shift + [ or ] (Windows), Command + Shift + [ or ] (macOS)
- Moves the selected layer to the bottom or top of the stack.
- New Layer: Control + Shift + N (Windows), Command + Shift + N (macOS)
- Creates a new layer.
- Group Layers: Control + G (Windows), Command + G (macOS)
- Groups selected layers into a folder.
- Ungroup Layers: Control + Shift + G (Windows), Command + Shift + G (macOS)
- Ungroups layers from a folder.
- Merge Layers: Control + E (Windows), Command + E (macOS)
- Merges selected layers into one layer.
- Combine All Layers into New Layer: Control + Shift + Alt + E (Windows), Command + Shift + Option + E (macOS)
- Combines all visible layers into a new layer on top.
Selections
- Select All: Control + A (Windows), Command + A (macOS)
- Selects the entire canvas.
- Deselect: Control + D (Windows), Command + D (macOS)
- Deselects the current selection.
- Reselect: Control + Shift + D (Windows), Command + Shift + D (macOS)
- Reselects the last selection.
- Inverse Selection: Control + Shift + I (Windows), Command + Shift + I (macOS)
- Inverts the current selection.
- Feather Selection: Shift + F6 (Windows and macOS)
- Applies feathering to the selection edges.
Blending Modes (Shift)
- Cycle Through Modes: Shift + + or Shift + – (Windows and macOS)
- Cycles through blending modes for the selected layer.
- Normal Mode: Shift + Alt + N (Windows), Shift + Option + N (macOS)
- Sets the blending mode to Normal.
- Multiply: Shift + Alt + M (Windows), Shift + Option + M (macOS)
- Sets the blending mode to Multiply.
- Screen: Shift + Alt + S (Windows), Shift + Option + S (macOS)
- Sets the blending mode to Screen.
- Overlay: Shift + Alt + O (Windows), Shift + Option + O (macOS)
- Sets the blending mode to Overlay.
Text and Fonts
- Bold: Control + Shift + B (Windows), Command + Shift + B (macOS)
- Applies bold formatting to the selected text.
- Italics: Control + Shift + I (Windows), Command + Shift + I (macOS)
- Applies italic formatting to the selected text.
- Underline: Control + Shift + U (Windows), Command + Shift + U (macOS)
- Underlines the selected text.
- Align Center: Control + Shift + C (Windows), Command + Shift + C (macOS)
- Align center Photoshop shortcut to the selected text.
- Align Left: Control + Shift + L (Windows), Command + Shift + L (macOS)
- Aligns the selected text to the left.
- Align Right: Control + Shift + R (Windows), Command + Shift + R (macOS)
- Aligns the selected text to the right.
Transform
- Photoshop Resize Layer Shortcut: Control + T (Windows), Command + T (macOS), to open Free Transform, allowing you to resize, rotate, and skew your layers
- Opens the Free Transform tool to resize, rotate, and skew.
- Scale Proportionately: Hold Shift while transforming (Windows and macOS)
- Maintains the aspect ratio while scaling.
- Rotate: Control + Alt + drag (Windows), Command + Option + drag (macOS)
- Rotates the selected element.
Image Adjustments
Fine-tuning images often involves adjusting various properties to get the perfect look. Photoshop makes this easier with Photoshop tool shortcuts that give you quick access to essential adjustment tools, helping you enhance your images effortlessly.
-
Brightness and Contrast: The shortcut Ctrl + M (Windows) or Command + M (Mac) opens the Curves dialog, not Brightness/Contrast. Brightness/Contrast has no default shortcut in Photoshop, but it can be accessed via Image > Adjustments > Brightness/Contrast.
-
Levels: Ctrl + L (Windows) or Command + L (Mac) opens the Levels adjustment dialog.
-
Curves: Ctrl + M (Windows) or Command + M (Mac) opens the Curves adjustment.
-
Hue/Saturation: Ctrl + U (Windows) or Command + U (Mac) opens the Hue/Saturation dialog, not Ctrl + Shift + U (which desaturates the image entirely).
-
Color Balance: Ctrl + B (Windows) or Command + B (Mac) opens the Color Balance dialog.
-
Photo Filter: This adjustment has no default shortcut and is accessed via Image > Adjustments > Photo Filter.
-
Adjustment Layers: There is no direct shortcut for creating a specific Adjustment Layer by default, but you can quickly open the New Adjustment Layer menu by pressing Alt + Ctrl + G (Windows) or Option + Command + G (Mac) when you are in the Layers panel.
These shortcuts are part of Photoshop’s design for workflow efficiency, but some tools, such as Photo Filter or Brightness/Contrast, require menu navigation unless users create custom shortcuts.
Window and Panel Shortcuts
Efficient workspace management is crucial for a smooth editing experience in Photoshop. The software offers several shortcuts to quickly toggle various interface elements, helping you stay organized and focused.
-
Toggle Full-Screen Mode: Press F (Windows and Mac) to cycle through different screen modes (Standard Screen, Full Screen with Menu Bar, Full Screen). This shortcut maximizes the workspace and minimizes distractions.
-
Toggle Panels: Press Tab (Windows and Mac) to show or hide all open panels, including the toolbar and options bar. This is useful for focusing solely on the canvas.
-
Toggle Toolbar: Use shift + tab (Windows and Mac) to toggle only the panels on the right, leaving the toolbar and options bar visible.
-
Layers Panel: Access or close the Layers panel by pressing F7 (Windows and Mac). It is essential for managing and editing layers quickly.
-
History Panel: Open or close the History panel with Ctrl + Z (Windows) or Command + Z (Mac) for quick undo and redo actions. The History panel itself does not have a specific shortcut to toggle visibility.
-
Toggle Options Bar: Press Ctrl + Shift + / (Windows) or Command + Shift + / (Mac) to show or hide the Options bar at the top of the screen.
These Photoshop shortcuts streamline your workflow, providing rapid access to panels and tools essential for editing. Incorporating these shortcuts can enhance your productivity and create a more immersive editing experience.
Other Useful Shortcuts
- Show Rulers: Control + R (Windows), Command + R (macOS)
- Toggles the rulers on and off.
- Show/Hide Grid: Control + ‘ (Windows), Command + ‘ (macOS)
- Toggles the grid on and off.
- Toggle Quick Mask Mode: Q (Windows and macOS)
- Toggles Quick Mask Mode on and off.
- Default Foreground/Background Colors: D (Windows and macOS)
- Resets the foreground and background colors to default (black and white).
- Switch Foreground/Background Colors: X (Windows and macOS)
- Switches the foreground and background colors.
- Fill with Foreground Color: Alt + Backspace (Windows), Option + Delete (macOS). Photoshop color fill shortcut for quickly applying the foreground color.
- Fills the selection or layer with the foreground color.
- Fill with Background Color: Control + Backspace (Windows), Command + Delete (macOS)
- Fills the selection or layer with the background color.
- Toggle Screen Modes: F (Windows and macOS)
- Cycles through screen modes: Standard, Full Screen with Menu Bar, and Full Screen.
- Hide Extras: Control + H (Windows), Command + H (macOS)
- Hides or shows extras like guides, grids, and selections.
Enhanced Photoshop Shortcuts
| Controller/Key | Description | Category |
| ⌘/Ctrl+M | Opens Curves Adjustment. | Adjustments |
| ⌘/Ctrl+U | Opens Hue/Saturation Adjustment. | Adjustments |
| ⌘/Ctrl+B | Opens Color Balance Adjustment. | Adjustments |
| ⌘/Ctrl+Shift + Alt/Option + B | Opens Black & White Adjustment. | Adjustments |
| ⌘/Ctrl+Shift + U | Desaturates image. | Adjustments |
| ⌘/Ctrl+L | Opens Levels Adjustment. | Adjustments |
| Shift + – | Cycles up blend modes. | Blending |
| Shift + + | Cycles down blend modes. | Blending |
| Ctrl + Alt/Option + Drag Left/Right | Adjusts brush size. | Brushes |
| Ctrl + Alt/Option + Drag Up/Down | Adjusts brush hardness. | Brushes |
| 1-9 | Sets brush opacity. | Brushes |
| ] | Increase brush size. | Brushes |
| [ | Decrease brush size. | Brushes |
| D | Resets foreground/background colors. | Colors |
| X | Swaps foreground/background colors. | Colors |
| Ctrl + N | New document. | File Management |
| Alt + 1-9 | Sets layer fill percentage. | Fills |
| Alt/Option + Delete | Fills layer with foreground color. | Fills |
| ⌘/Ctrl + Delete | Fills layer with background color. | Fills |
| Shift + Delete | Opens fill options dialog. | Fills |
| 1-9 | Sets layer opacity. | Fills |
| ⌘/Ctrl + F | Repeats last filter. | Filters |
| Ctrl + Alt + Z | Step backward (undo). | History |
| Ctrl + Shift + Z | Step forward (redo). | History |
| Ctrl+Tab | Cycles through open documents. | Interface |
| Shift + Tab | Hides/shows panels except toolbox. | Interface |
| Tab | Hides/shows all panels. | Interface |
| F | Switches between screen modes. | Interface |
| ⌘/Ctrl + [ | Moves layer down one. | Layers |
| ⌘/Ctrl + Shift + G | Ungroups layers. | Layers |
| ⌘/Ctrl + Shift + N | Creates a new layer. | Layers |
| ⌘/Ctrl + J | Duplicates the current layer/selection. | Layers |
| ⌘/Ctrl + Shift + J | Makes a new layer via cut. | Layers |
| ⌘/Ctrl + E | Merges current layer with the one below. | Layers |
| ⌘/Ctrl + Shift + E | Merges all visible layers. | Layers |
| ⌘/Ctrl + Shift + Alt/Option + E | Merges all visible layers into a new composite layer. | Layers |
| Alt/Option-click on eye icon | Hides all layers except selected. | Layers |
| Alt/Option-click between layers | Creates a clipping mask. | Layers |
| ⌘/Ctrl + Shift + ] | Brings layer to the top. | Layers |
| Alt/Option-Click on layer mask icon | Views layer mask. | Layers |
| ⌘/Ctrl + Shift + [ | Sends layer to the bottom. | Layers |
| ⌘/Ctrl + ] | Moves layer up one. | Layers |
| ⌘/Ctrl + G | Groups layers together. | Layers |
| Space Bar | Switches to Hand Tool. | Navigation |
| ⌘/Ctrl + S | Saves document. | Saving |
| ⌘/Ctrl + Shift + S | Save As dialog. | Saving |
| ⌘/Ctrl + Alt/Option + Shift + S | Opens Save for Web dialog. | Saving |
| Q | Quick Mask mode. | Selections |
| ⌘/Ctrl+A | Selects everything on the screen. | Selections |
| ⌘/Ctrl+D | Deselects everything. | Selections |
| ⌘/Ctrl+Click on a Layer | Selects the contents of a layer. | Selections |
| ⌘/Ctrl+Shift+I | Inverts a selection. | Selections |
| ⌘/Ctrl + Alt/Option + A | Selects all layers. | Selections |
| ⌘/Ctrl + Alt/Option + R | Opens Refine Edge menu. | Selections |
| E | Eraser Tool. | Tools |
| Z | Zoom Tool. | Tools |
| A | Path Selection Tool. | Tools |
| G | Gradient Tool. | Tools |
| U | Custom Shape Tool. | Tools |
| P | Pen Tool. | Tools |
| C | Crop Tool. | Tools |
| J | Spot Healing Brush. | Tools |
| I | Eyedropper Tool. | Tools |
| B | Brush Tool. | Tools |
| L | Lasso Tool. | Tools |
| O | Dodge Tool. | Tools |
| M | Marquee Tool. | Tools |
| S | Clone Stamp Tool. | Tools |
| T | Type Tool. | Tools |
| H | Hand Tool. | Tools |
| R | Rotate Tool. | Tools |
| Shift + Key | Cycles through sub tools. | Tools |
| V | Move Tool. | Tools |
| W | Magic Wand/Quick Selection Tool. | Tools |
| Y | History Brush. | Tools |
| ⌘/Ctrl + T | Transforms selected layer. | Transform |
| Alt/Option + Left/Right Arrow Keys | Adjusts kerning. | Type |
| Alt/Option + Up/Down Arrow Keys | Adjusts leading. | Type |
| ⌘/Ctrl + Alt/Option + Shift + > | Increases text size by 10pt. | Type |
| ⌘/Ctrl + Shift + H | Makes text small caps. | Type |
| ⌘/Ctrl + Shift + C | Centers text. | Type |
| ⌘/Ctrl + Shift + B | Makes text bold. | Type |
| ⌘/Ctrl + Shift + I | Italicizes text. | Type |
| ⌘/Ctrl + Shift + L | Aligns text left. | Type |
| ⌘/Ctrl + Shift + R | Aligns text right. | Type |
| ⌘/Ctrl + Shift + U | Underlines text. | Type |
| + and – with selected text | Cycles through fonts. | Type |
| ⌘/Ctrl + Alt/Option + Shift + < | Decreases text size by 10pt. | Type |
| Double-click T icon | Selects all text in a layer. | Type |
| ⌘/Ctrl + Shift + K | Makes text all caps. | Type |
| ⌘/Ctrl+ – | Zooms out. | Viewing |
| ⌘/Ctrl+ + | Zooms in. | Viewing |
| ⌘/Ctrl+ 0 | Fits document to screen. | Viewing |
| ⌘/Ctrl+R | Shows/hides rulers. | Viewing |
| ⌘/Ctrl+I | Inverts image/layer/selection. | Viewing |
| Ctrl + H | Shows/hides guides. | Viewing |
| ⌘/Ctrl + Alt/Option + I | Opens image size dialog. | Viewing |
| ⌘/Ctrl + Alt/Option + C | Opens canvas size dialog. | Viewing |
Conclusion
Incorporating these Photoshop keyboard shortcuts into your daily workflow can dramatically enhance your productivity and creative efficiency. By minimizing time spent navigating menus and maximizing your hands-on design time, these shortcuts empower you to produce stunning visuals with greater ease and precision. Start practicing these commands today and experience the difference in your creative projects.
Mastering these essential keyboard shortcuts will not only save you time but also improve your overall Photoshop experience. With faster access to tools and more streamlined workflows, you can focus more on the creative aspects of your projects. Embrace these shortcuts to transform your Photoshop skills and take your designs to the next level.
By integrating these powerful keyboard shortcuts for Adobe Photoshop into your routine, you’ll be able to work more efficiently and creatively. Whether you’re adjusting layers, refining selections, or navigating the interface, these Photoshop quick keys will help you achieve your design goals more swiftly. Enhance your productivity and elevate your design game by mastering these essential shortcuts.