
How to Transfer Your Domain to a New Registrar Easily

Transferring your domain to a new registrar can streamline management, save costs, or offer access to better features and support. While the process may seem complicated, breaking it down into simple steps makes it manageable and efficient. This guide will walk you through each step to ensure your domain transfer goes smoothly.
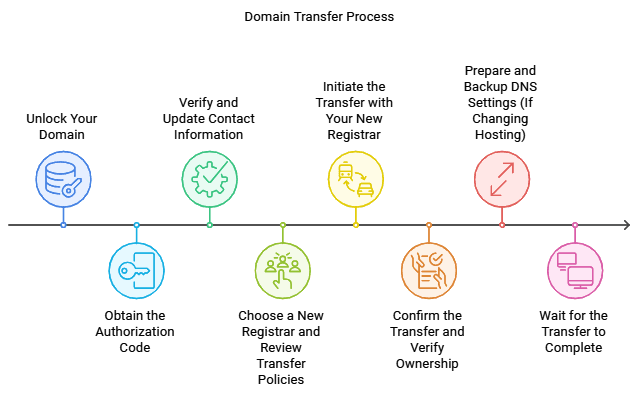
Step-by-Step Guide to Transferring Your Domain
1. Unlock Your Domain
The first step in any domain transfer is to unlock the domain at your current registrar, which prevents it from being transferred unintentionally. Here’s how to do it:
- Log in to your current domain registrar account.
- Navigate to the “Domain Management” or “Domain Settings” section.
- Locate the option to “Unlock Domain” and enable it.
Tip: Some registrars may automatically lock domains after a transfer request, so make sure it stays unlocked until the transfer is complete.
2. Obtain the Authorization Code
The authorization code, also called an Auth Code or EPP Code, is a unique key required to confirm your ownership of the domain and authorize the transfer.
- Find the option to request the authorization code in your domain settings.
- The code may be displayed in your dashboard or sent to your email.
Important: Keep this code secure as it’s essential for authorizing the transfer to your new registrar.
3. Verify and Update Contact Information
Ensure that the email associated with the domain’s WHOIS information is up-to-date and accessible. During the transfer, confirmation emails are often sent to the current registered email address, so verifying this is crucial for a seamless transfer.
- Log in to your registrar account.
- Check and update the WHOIS email address in the domain settings.
4. Choose a New Registrar and Review Transfer Policies
Selecting a new registrar with the right services and features is essential. Look for factors like customer support, pricing, added benefits (e.g., free WHOIS privacy), and ease of domain management.
Checklist for Choosing a Registrar:
- Check for transfer fees and confirm any renewal discounts.
- Confirm if WHOIS privacy protection is included.
- Review any additional benefits, like email or SSL options.

- 24/7 customer support to keep you online
- Hosting with 99.9% uptime guaranteed

- Easy drag & drop WordPress builder
- Get started with over 300 templates

- 99.99% uptime guarantee
- Free SSL certificate
5. Initiate the Transfer with Your New Registrar
After selecting your new registrar, initiate the transfer by providing them with the domain name and authorization code.
- Log into your new registrar’s account and navigate to the domain transfer section.
- Enter your domain and the authorization code when prompted.
- Review any fees and confirm the transfer.
Once submitted, the new registrar will contact your current registrar to begin the transfer.
6. Confirm the Transfer and Verify Ownership
You may receive an email from both your current and new registrar to confirm the transfer. Follow the instructions provided to authorize the change of ownership and complete the transfer.
Typical Verification Steps:
- Confirm your identity and approval for the transfer via email.
- Verify that your contact information is up to date to prevent delays.
7. Prepare and Backup DNS Settings (If Changing Hosting)
If your hosting is also changing, make sure to back up your DNS settings before transferring. This step ensures a seamless transition without downtime for your website.
- Go to your current DNS settings and make note of configurations (such as A records, MX records, and CNAMEs).
- After transferring, reapply these settings with your new provider if necessary.
8. Wait for the Transfer to Complete
Domain transfers usually take between 5 to 7 days to finalize. During this time, you can still manage your domain and access essential features. Once complete, you’ll receive a confirmation from the new registrar.
Related Articles


Additional FAQs on Domain Transfer
How long does it take to transfer a domain name?
Most domain transfers take 5-7 days to complete. However, delays can occur if verification steps aren’t completed promptly or if either registrar requires additional information. Be sure to check your email regularly during the transfer period to avoid unnecessary delays.
Will my website go down during a domain name transfer?
Generally, your website will remain live during a domain transfer, as the domain name itself is moving, not the hosting service. To prevent downtime, ensure your DNS settings remain unchanged, or keep them backed up in case you need to reapply them.
Will my website content transfer along with my domain name?
No, only the domain name is transferred. Your website content, emails, and files remain on the current hosting server. If you’re also changing hosting providers, you’ll need to back up your website content and transfer it separately to the new host.
How do I prepare my domain name for transfer?
Preparation includes unlocking your domain, obtaining the authorization code, and ensuring your contact details (especially your email) are up to date. To avoid delays, check for any restrictions, like the 60-day lock after recent transfers or registrations.
Things to Consider Before Transferring a Domain
- Transfer Fees and Renewal Costs
Review the new registrar’s transfer fees and renewal pricing to avoid unexpected costs. - Domain Expiration
To avoid complications, ensure your domain is not within 60 days of expiration. Many registrars do not allow transfers within this period to ensure stability. - Locked Domains
Some domains are automatically locked for 60 days after registration or previous transfers, so check your domain’s status beforehand. - Check for DNS Propagation
After the transfer, be aware that DNS changes can take time to propagate globally (up to 24–48 hours). Planning this transfer during low-traffic times can help minimize any impact on your website.
Conclusion
Transferring a domain is straightforward when you follow the proper steps. You can easily move your domain by unlocking your domain, obtaining the authorization code, verifying contact details, and carefully selecting a registrar. Following these tips ensures a smooth transfer, allowing you to enjoy the benefits of your new registrar with minimal hassle.